The Accidental Embroiderer

A freebie from Secrets.

As you may know, I do a lot of designs for the Secrets of Embroidery website, and recently I’ve been organising a new collection for them. Without meaning to be rude, I have to say that many machine embroiderers who buy designs prefer to use the simpler and more conventional kind of designs, so the things I do for my “Secrets” collection aren’t always very exciting. My recent efforts are distinctly floral, and not very original, but I found these designs interesting to do. They are all oriented on the diagonal, as I thought that might be useful to people finishing off the corners of cushions and quilts.

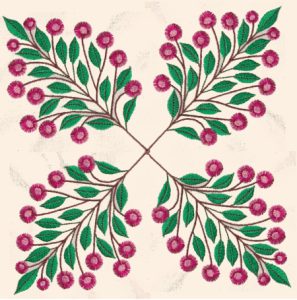
However while I was playing around with them, I found that if you just made 4 copies of a diagonal design, and then rotated the orientation of three of them, you could make a very interesting construction out of them. That’s probably not very clear, so here’s an example:

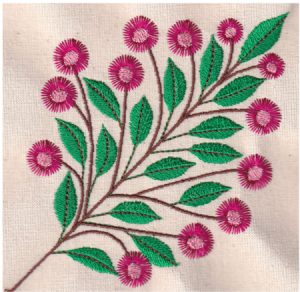
Here is a floral design, designed on the diagonal


And here is the same design, moved into a more complicated construction


This design is free on the Secrets site, but I’m also putting it up here: just click on this link:   Download Free diagonal v6  It’s just the single design – not the large 4-times one! It’s for the 4×4 inch (100 x 100 mm) hoop and is in .pes v.6

A summer freebie

Right – as I promised in my last message, it’s time for another freebie.  I haven’t the least idea where the idea for this one came from, apart from the fact that peacocks are among the most spectacular birds you could imagine, and are endlessly inspirational


The summer peacock

There’s nothing special about this one – it’s for the 5 x 7 inch (130 x 150 mm) hoop, but it’s quite a large project – it took me an hour an a half to stitch out. But it has a “presence” which might make all the time worth it, if you can find a good home for it. Click on this link:  Download Peacockv6 to download it in .pes v.6

A zentangle Aries

Time for another of the zentangle zodiacs. This one is Aries the Ram, and as with all the others it took a very long time to draw and digitise.

Aries

Aries the Ram

Cherri has a friend who’s an Aries, so she used the design on a T-shirt as a birthday present, along with “Aries” done in an elaborate script. The embroidery itself is very complex, with both dense and thin areas, so rather than stitch it directly on the stretchy jersey of the T-shirt, she stitched it on a square of firm material and then stitched that to the shirt. I think it’s turned out brilliantly and I hope her Aries friend likes it!

Unnamed

Aries on a T-shirt
 

As I'm really doing these zodiac designs just for my own pleasure (and not as a commission or for an exhibition) I think I’ll put them on the “For Sale” pages as soon as they’re all done and test-stitched. That will be a while, though – I think I’ve only got seven or eight finished at the moment so there are a few left to do

Five fishes

A few weeks ago I posted photos of some decorative herrings.
Here is another fish hanging, but this time it’s based on tropical fish. The
bodies and fins are embroidered separately and then stitched together and
lightly stuffed. The fins are stiffened with PVA glue, and the fish strung
together with nylon fishing line, which makes the connection between them
almost invisible. The photo is so long that you need to scroll to see it all but I didn't want to make it smaller as then you couldn't have seen the details

 
Fourfish

The mobile is a lot of fun to look at and I really enjoy
having it up. It wasn’t a lot of work to make, and for a while I was thinking
of submitting the patterns and the directions to a craft magazine so that other
people could make it. However it can be a bit fiddly, and the stitching of the
fins is particularly challenging, so perhaps I’d better choose something a bit
simpler to submit for publication

The Silver Darlings part 2

Right – here is a collection of herring, done in different fabrics and with different patterns and detailing. I particularly like the effect of the silver lame, although it’s not an easy fabric to work with. I’m not sure what I’m going to do with these – they’ll probably be popular at out next exhibition so I may do some more to sell

Fish
A school of herring

The Silver Darlings part 1

Recently I’ve been working on ideas that combine machine embroidery with other crafts to make different kinds of decorative objects, and here’s one that's based on the unlikely idea of a string of herrings. The coast of the north-east of Scotland (where I live) has a strong tradition of herring fishing, and around here if you refer to the “silver darlings”, everyone will know that you’re talking about the herrings. So here is the first stage of a tribute to the little silvery fish
I sketched several different versions of herring and digitised one to use in trying out various ways of making the fish. The fish itself was easy enough – I just stitched out the right and left halves and then stitched the two together, leaving a gap with which to turn the fish and stuff it with a little batting. The fins and tail were a trickier proposition, but eventually I worked out a way to add embroidered fins that were translucent and rigid (this technique is too long and complicated to describe here but if anyone’s interested, just drop me a line)
The result is, I think, a modest success, and I will now go on to make more herrings from different fabrics with different embroidered details

Fish1
The first of several herrings

Making a face

For some reason – don’t ask me why – I’ve recently developed
a mad urge to design masks, especially extreme types like fantasy animals and
extravagant Venetian Carnival masks. But there isn’t a lot of point in
designing something if you can’t make it, so I’ve been looking into various
ways of making embroidered masks. First, I sketched a quick and simple design, digitised it and stitched it out

Mask1
A simple mask design stitched on felt

Felt seemed a good material to
use, as it’s thick and robust, and should be a little bit stretchable.
However it’s too floppy to use as it comes, so I needed some way of hardening
it. I had intended to use a dilute solution of PVA glue, but I came across a
bottle of fabric stiffener in my stores so used that instead

I also bought a cheap polystyrene head from e-bay for a
couple of pounds. I think it‘s supposed to be used as a hat or wig stand, but
it was just what I needed to mould the mask on. After soaking the cut-out
embroidered felt mask in fabric stiffener and protecting the polystyrene face
with plastic film, I placed the mask on the head and moulded it to shape. The
felt stretched and compressed very well, and I held it in place with pins while
the fabric dried


Mask2
The fabric mask, soaked in fabric stiffener and pinned in place on the polystyrene head


And here’s the finished mask, dried and ready to be further decorated
with paint, feathers, sequins or whatever you like

Mask3

Mask4
Isobel tried it on even before it was decorated and it fitted perfectly

I am very pleased with the
method and will start extending the technique a bit. I want to try painting the
fabric before it’s embroidered, and also use some applique in the design. To my
surprise the raw edges of the felt looked pretty good just as they were, but
I’d also like to try stitching masks on a soluble stabiliser so I can define
the edges with a finishing stitch

Finally I need to solve the problem of noses. The felt is
very flexible and easy to shape, especially when it’s wet, but I don’t think I
could stretch it far enough to make into a long nose. I’ll have to stitch or
glue in a separate piece, and will need to work out how to disguise the join

The Hawaiian bags

Recently Cherri has been planning a trip to Hawaii with some friends, and has come up with a lovely idea for travel presents. She wanted to make quilted bags in a typical Hawaiian quilting style and asked me to come up with some applique designs that she could use

I don’t really know anything about Hawaiian quilting apart from the fact that it seems to involve large squares of stylised and appliqued flowers and leaves, invariably done in radially symmetrical designs. I suspect that the design tradition has its roots in the tapa designs of the South Pacific, but that’s only a guess

The designs are simple and fun to do, and rather remind me of the papercuts I used to make as a child. Cherri has interpreted them in brilliant tropical colours and I think the finished bags are stunning


Jackie

Bev

A South Pacific inspired panel

Here’s the panel I’ve been working on recently. It’s made up of the tapa fish and tapa blocks I did a couple of years ago, based on motifs from South Pacific bark cloth designs. I always feel slightly guilty about so rarely making things with my own designs so I thought I’d better put these to some use and not just keep them in storage. The blocks are stitched separately and then just pieced together, which should be simple but for someone with my minimal sewing skills took a while to do

Inprogress
Panel in progress


Tapapanel
Finished tapa panel

The final panel looked pretty good, and I thought that it might make a good cushion cover (which is why it's included in the "Designs for Projects" section). But that would involve yet more sewing so maybe I’ll just keep it as a panel. It needs backing and binding, of course, but I think I’ll leave that for another day and get back to doing the designs

Mats for cats

Before Christmas, Cherri was trying to think of presents to give to those of her friends who had cats as pets, and she asked me to produce some designs which she could stitch on to "cat-mats". Apparently these are mats which the cats sit and lie on, which protect furniture from cat-hairs and which can be easily washed. So I did some decorative cat designs which eventually turned up on some of Cherri's cat-mats


Cat1
Cat2

Floral cats for decorative mats

Personally I would have used darker, richer colours for these, but Cherri pointed out that paler colours don't show cat hairs as easily as dark colours, and as a cat owner herself she probably knows best